 Common sense cleaning for tubular and robotic surgical instruments. Read more for questions and solutions.
 SurgiClean® Products solve surgical instrument cleaning problems.
 SurgiSonic® 1211X Inservice for cleaning tubular and robotic surgical instruments.
 SurgiSonic® Dual Cleaning Method cleans both ends fo a da Vinci® instrument a the same time.
PART I: SurgiSonic® 1211X Identification of Components and Setting Up the Machine
PART II: SurgiSonic® 1211X Inservice for Cleaning Non-Robotic Tubular Instruments
PART III: SurgiSonic® 1211X Inservice for Cleaning Loose Instruments
PART IV: SurgiSonic® 1211X For Cleaning da Vinci® Robotic Tubular Instruments
Inservice for Cleaning Tubular & Robotic Surgical Instruments SurgiSonic® 1211X Inservice YouTube Video This basic SurgiSonic® 1211X in-service will
- identify the machine parts and how to set up the machine,
- how to clean regular tubular surgical instruments,
- how to clean loose instruments,
- how to clean robotic tubular surgical instruments using our patented technology.
In-Service: SurgiSonic® 1211X Tubular Surgical Instrument Cleaning Machine The SurgiSonic® 1211X surgical instrument cleaning machine combines ultrasonic action/suction/and filtration to individually clean up to six submersible non-robotic tubular surgical instruments, or three submersible *da Vinci® robotic instruments, inside and out. A basket is included for cleaning loose instruments in a separate cycle.

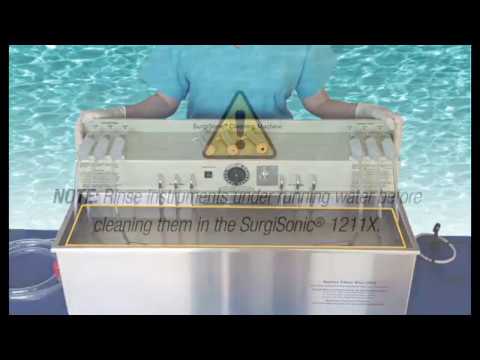
PART I: SurgiSonic® 1211X Identification of Components and Setting Up the Machine The SurgiSonic® 1211X is easy to set up, easy to use, and easy to maintain.


The ultrasonic tank is sitting on a shelf that is attached to the suction pump housing. NOTE: Rinse all instruments under running water before and after cleaning and rinsing them in the SurgiSonic® 1211X.
1) Attach drain tubing: Reach inside the hole on the left side of the machine and pull out the drain tubing. Attach tubing to drain valve and place open end into a sink. Point handle down to close valve.
2) Plug in machine: Reach inside the hole on the right side of the machine and carefully pull out the electric cord that is attached to the timer dial and insert the plug-end into a 110/120 VAC wall outlet.
3) Fill ultrasonic tank: Fill ultrasonic tank with 5 gallons of warm, 115 degrees, water.
4) Add enzyme cleaner: Add 5 ounces of pH neutral SurgiSoak® enzyme cleaner to the ultrasonic bath water.
NOTE: NEVER run ultrasonic tank without 5 gallons of water in the tank and a lid placed on top of it.
NOTE: NEVER hang suction chambers, empty or engaged, outside of tank while pumps are on. NOTE: NEVER use any type of caustic, corrosive or coagulating substances in, or on, the SurgiSonic®.


5) The SurgiSonic® comes with 6 individual, inline, #3312 SurgiSuction® suction chambers, filters, suction pumps, and fluid return tubes already attached to the pump housing unit. The three in-line suction chambers and filters on the left side are individually attached to pumps #1, #2 and #3. The three in-line suction chambers and filters on the right side are individually attached to pumps #4, #5 and #6.
CONTROLS FOR RUNNING THE MACHINE ARE LOCATED ON THE FRONT OF THE PUMP HOUSING:

On the front of the pump housing there is a circuit breaker, a timer dial, and a pump cleaning cycle switch.
6) Pump switch: The small metal switch to the right of the timer dial controls the suction pump speed.
-
- The NORMAL, up, pump switch position is used to clean most instruments.
- The OFF, middle, pump switch position turns off the pumps.
- The FAST, down, pump switch position is used for a quicker cleaning time or higher suction power to clean older, clogged, tubular instruments.
NOTE: Set the suction pump cleaning speed BEFORE turning on the timer dial. NOTE: NEVER change pump speed while machine is on.
7) Timer dial: The timer dial turns on the machine for up to 30 minutes.
NOTE: NEVER turn timer dial past 30 minutes; if turned past 30 minutes the timer dial will break. NOTE: NEVER turn timer dial on until after:
- The ultrasonic tank has been filled with 5 gallons of cleaning solution,
- the instruments have been setup and lowered into the ultrasonic bath,
- the lid has been placed on the ultrasonic tank,
- and the speed has been set.
NOTE: Normal cleaning cycles are 15 minutes: Use fast speed 30 minute cycle to clean clogged instruments. NOTE: NEVER hang suction chambers outside of the ultrasonic bath while the machine is running.
Rinse Cycle:
- With timer off; empty cleaning solution from the ultrasonic tank.
- Close drain valve.
- Refill tank with 5 gallons of water.
- Repeat instrument setup.
- Cover ultrasonic tank with lid.
- Set pump speed to normal.
- Set timer for 5 minutes.
PART II: SurgiSonic® 1211X Inservice for Cleaning Non-Robotic Tubular Instruments


NOTE: Rinse all instruments under running water before and after cleaning and rinsing them in the SurgiSonic® 1211X.
The SurgiSonic® 1211X comes fitted with six #3312 SurgiSuction® suction chambers. These suction chambers were designed to MAXIMIZE the amount of suction applied to the distal end and interior shaft of the inserted non-robotic tubular instrument. These six suction chambers come fitted with six #3212 medium hole, latex free, rubber nipples for cleaning instruments 5mm to 10mm in diameter, The SurgiSonic® also comes with six #3205 small hole rubber nipples for inserting instruments 1.7mm to 5mm in diameter, and six #3215 large hole rubber nipples for inserting instruments 10mm to 12mm in diameter.
- Set up machine: Close drain valve, plug cord into 110/120 outlet, fill tank with 5 gallons of warm, 115⁰, water.
- Add Enzyme cleaner: Add 5 oz of SurgiSoak® pH neutral enzyme cleaner.
- Fit rubber caps onto suction chambers. Fit a small/medium/or large hole, latex free, rubber nipple onto each #3312 SurgiSuction® suction chamber to accommodate the shaft diameter of the instrument to be cleaned.
- Attach instrument: Insert the entire distal, jaw/hinge, area of the non-robotic tubular surgical instrument into the suction chamber through the properly sized hole in the attached rubber nipple and lower into ultrasonic bath.
- Place lid on ultrasonic tank.
- Set pump speed: Place metal switch in up position for normal, middle for off, and down for fast.
- Set timer dial: Set for 15 minutes to start cleaning cycle, or 30 minutes for clogged instruments.
Rinse Cycle:
- With timer off; open drain valve to empty cleaning solution from the ultrasonic tank,
- close drain valve,
- refill tank with 5 gallons of water,
- repeat instrument setup,
- cover tank,
- set pump speed normal,
- set timer for 5 minutes.
NOTE: NEVER hang suction chambers, empty or engaged, outside of the ultrasonic bath while machine is on.
NOTE: A fast speed 30 minute cycle is recommended for cleaning clogged instruments for the first time.
NOTE: NEVER clean loose instruments at the same time as inserted tubular instruments!
PART III: SurgiSonic® 1211X Inservice for Cleaning Loose Instruments


NOTE: Rinse all instruments under running water before and after cleaning and rinsing them in the SurgiSonic® 1211X.
The #3620 basket for cleaning loose instruments comes with the SurgiSonic® 1211X. TO CLEAN:
- Set up machine and add enzymes as stated above.
- Lower loaded loose instrument basket into the ultrasonic bath over the attached, empty suction chambers.
- Cover with lid.
- Set pump speed to normal.
- Turn timer on for 15 minutes.
TO RINSE:
- With timer off; open drain valve to empty cleaning soluticlose drain valve,on from the ultrasonic tank,
- close drain valve,
- refill tank with 5 gallons of water,
- repeat instrument setup,
- cover tank,
- set pump speed normal,
- set timer for 5 minutes.
NOTE: NEVER clean loose instruments at the same time as inserted tubular instruments!
PART IV: SurgiSonic® 1211X For Cleaning da Vinci® Robotic Tubular Instruments

Patented Cleaning Process – Independently Tested for Cleaning Effectiveness; exceeded AAMI TIR 30.

Because a tight seal separates the jaw/pulley end from the shaft/control box end, TBJ, Inc. has developed a patented dual hook-up method for independently cleaning both the distal and the proximal segmented areas of a *da Vinci® robotic instrument at the same time. Three *da Vinci® robotic instruments, including the S, Si, or Xi, can be cleaned at the same time using this dual hook-up method.
NOTE: Rinse all robotic instruments under running water before and after cleaning and rinsing them in the SurgiSonic® 1211X.
Two different types of suction chambers are used for this dual hook-up method.

#3315 SurgiScrub® scrubbing chamber with #3212 nipple

Before Cleaning

AfA After Cleaning
1) The multi-holed #3315 SurgiScrub® scrubbing chamber, fitted with the #3212 medium hole latex free rubber nipple, was specifically designed to clean the segmented tool end of a *da Vinci® robotic instrument. The smaller inside diameter and the multiple holes drilled in the SurgiScrub® scrubbing chamber allows fluid to be sucked into the chamber in such a way as to maximize the scrubbing and removal of debris from the intricate jaw and pulley areas of the *da Vinci® robotic instrument.
NOTE: The multi-holed #3315 SurgiScrub® scrubbing chamber can only be used to clean the distal tool-end of a segmented robotic surgical instrument; as it cannot create the kind of unrelenting suction power that is needed to remove debris from the interior shaft of any type of tubular surgical instruments.
2) The #3212 SurgiSuction® suction chamber applies maximum suction to the shaft of tubular instruments.

The # 3200 male to male luer slip connector is used to attach the control box/and shaft of the da Vinci® robotic instrument to the # 3312 SurgiSuction™ suction chamber.

The # 3312 SurgiSuction™ suction chamber was designed to apply a maximum amount of suction to the interior shaft of robotic & non-robotic tubular instruments.

MACHINE SET UP – LEFT SIDE:
- Remove the three SurgiSuction™ suction chambers from the plastic filter tubing on the left hand side.
- Attach a #3212 medium hole rubber nipple onto each of the three #3315 SurgiScrub® scrubbing chambers.
- Attach the three fitted SurgiScrub® scrubbing chambers to the filter tubing on the left hand side.
MACHINE SET UP – RIGHT SIDE:
- Attach a #3212 medium hole rubber nipple onto each of the three #3312 SurgiSuction™ suction chambers that are already attached to the right side filter tubing.
DUAL HOOK UP FOR CLEANING SUBMERSIBLE *da Vinci® ROBOTIC TUBULAR INSTRUMENTS:
- The same set-up instructions apply for attaching the S, Si and Xi *da Vinci® instruments to the SurgiSonic®.

TO CLEAN:
- Close drain valve.
- Fill ultrasonic tank with 5 gallons of warm 115⁰ water.
- Add 5 oz. of SurgiSoak® enzyme cleaner.
- Plug machine into a 110/120 VAC wall outlet.
INSTRUMENT INSTALLATION – LEFT SIDE - Insert the entire jaw/pulley area of the *da Vinci® robotic instrument into the SurgiScrub® scrubbing chamber. INSTRUMENT INSTALLATION – RIGHT SIDE
- Insert one end of the male to male luer slip connector into the #2, output, hole of the *da Vinci® control box. Next, insert the other end of the male to male luer slip connector into the medium hole rubber nipple that has been fitted onto the SurgiSuction® suction chamber. Holding both ends, carefully lower instrument into tank.
- Cover tank with lid.
- Set pump speed to normal.
- Set timer dial for 15 minutes.
NOTE: A fast speed 30 minute cycle is recommended for cleaning clogged instruments for the first time. NOTE: NEVER clean loose instruments at the same time as inserted tubular instruments!

Insert luer slip connector into #2 hole of the control box. Insert other end into the fitted SurgiSuction® suction chamber.
TO RINSE:
- With timer off; open drain valve to empty cleaning solution from the ultrasonic tank,
- close drain valve,
- refill tank with 5 gallons of water,
- repeat instrument setup,
- cover tank,
- set pump speed normal,
- set timer for 5 minutes.
*da Vinci® is a trademark of Intuitive Surgical Inc.